Edit - Animals
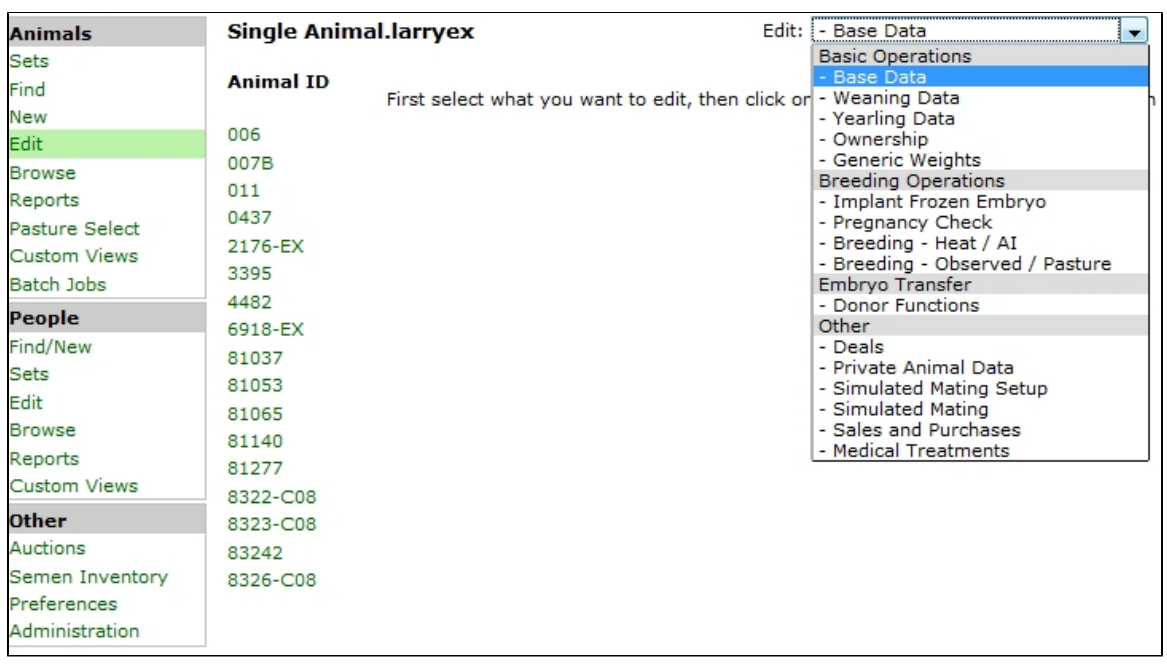
Clicking the "Edit" link provides access to a number of edit/entry screens as shown in the insert below. Several of these screens serve both as edit screens for changing existing information and also for entering new information. Your current active set animal IDs listed in sorted order is always shown in the edit/entry screens. A screen is selected by clicking on the screen name in the drop down. You can navigate from one screen to another for any given set by clicking on the screen name in the drop down.
Base Data Animal Edit
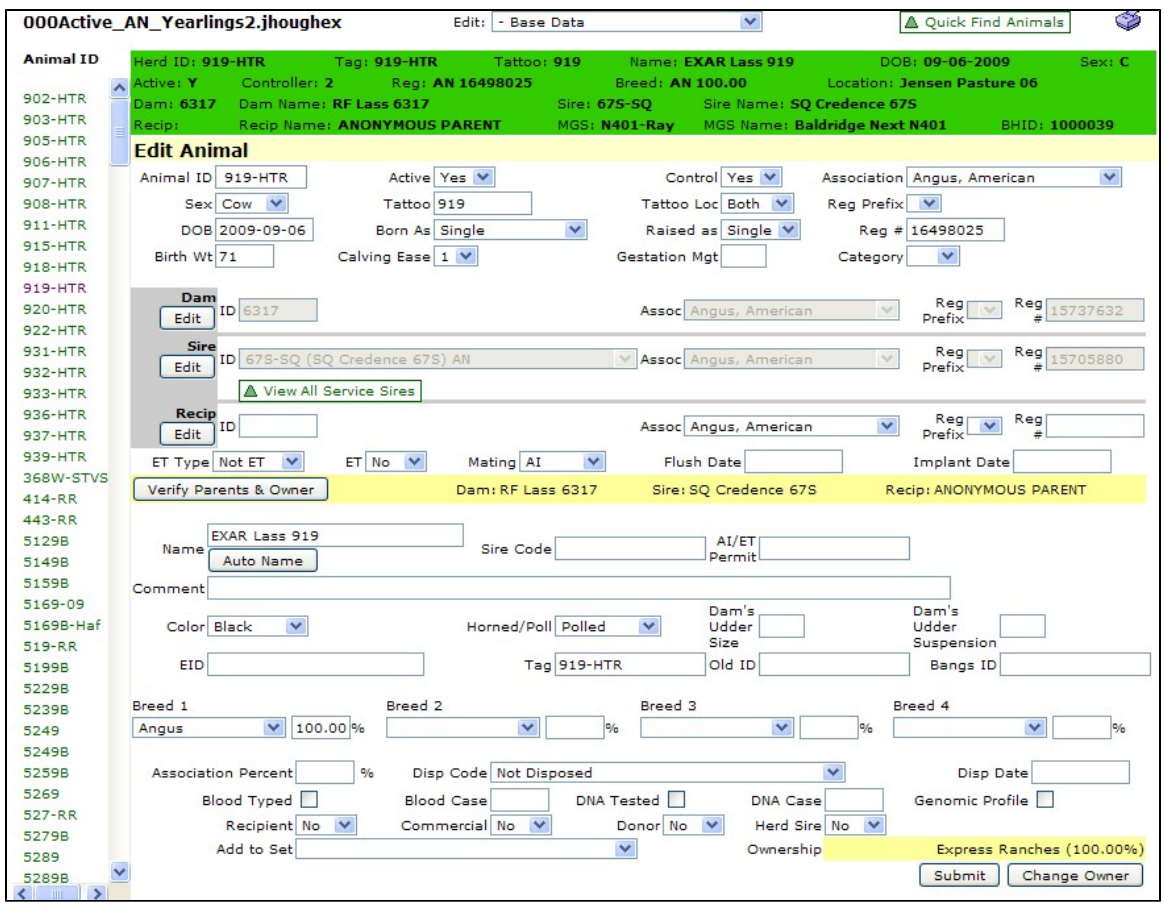
The Base Data Edit / Entry screen is shown below. This screen serves as an edit screen for changing existing information and also for entering new information on individual animals. The box titles are self-explanatory. Entries or changes are made in the appropriate boxes and then you must click one of the two button at the lower right-hand side of the screen ("Submit" or "Change Owner") Usually you will click "Submit". However, if the ownership (seen in the lower right of the screen) of the animal requires correction you click "Change Owner" and the data in the screen is written to the database and the Edit Ownership screen pops up where you can correct ownership (see Edit Ownership).
Note that the green stripe at the top of the screen shows basic information about the individual you are about to edit. This green stripe information is shown in all edit and browse screens. Always make sure this is the animal you wish to edit.
Any information in the screen boxes can be changed; however, if you are doing downloads from your association on a routine basis very seldom would information in this screen need to be changed on animals already registered with your association. The exceptions here would be addition of a Tag, Old ID or a Bangs ID. You can enter blood typing or DNA case information. An important field in this screen which might be changed later in a cow's life is the Recipient field which has to be 'Yes' if the cow is to be used as a recipient. The Commercial box is important for purebred calves that need to be turned into an association but not registered. You can designate a Herd Sire in this screen but you must control the bull and he must be active for your log in (Most of the time it is easier to use the Edit Private Animal screen for designating a Herd Sire).
For older registered animals this is the screen that is used most often to add a pertinent comment concerning the individual.
Note that to change a parent you have to first click the "Edit" button associated with the parent. Once you change the parent you must click the "Submit" button at the bottom right-hand side of the screen.
Weaning Data Edit
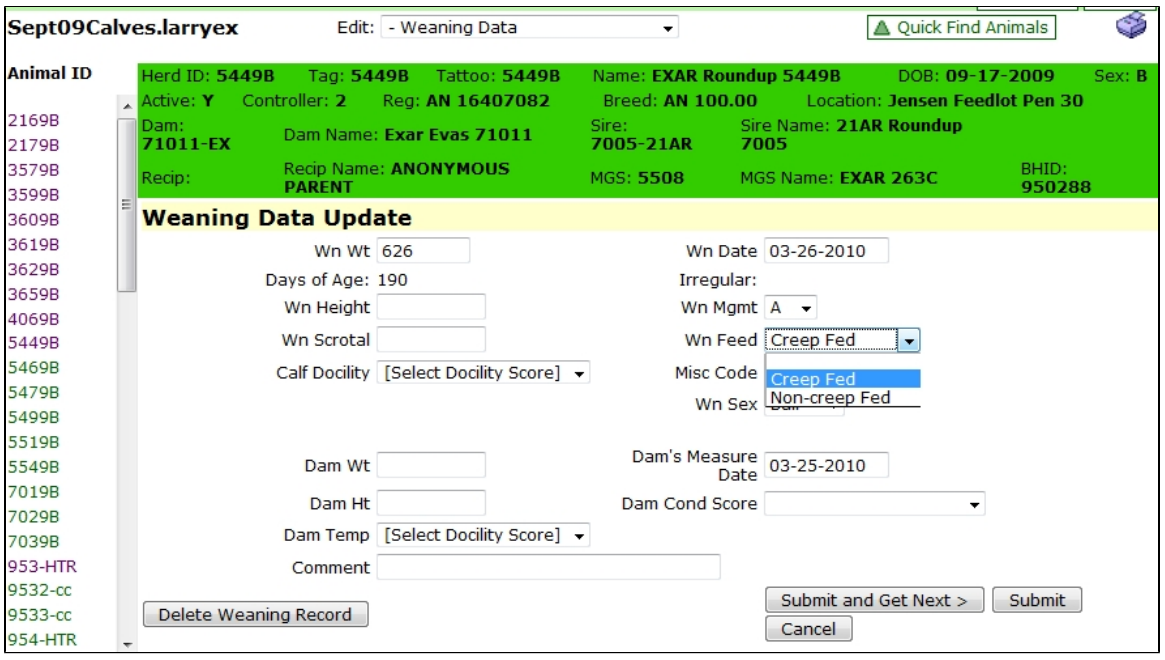
The Weaning Data Edit / Entry screen is used to enter weaning data on a calf and also on the dam of the calf at weaning. As seen below the screen has self-explanatory boxes for entering data. Note the drop downs for Creep and Non-creep Fed along with calf docility scores and Wn Mgmt codes. There are drop downs for dam temperament and dam condition code. The dam information is maintained as part of the calf's weaning record so that multiple years data can be accumulated on any cow. Dam information can only be entered for non-ET and non-fostered calves, thus dam data entry boxes are not present for ET and Foster calves.
A good method of handling weaning weights is to develop a weigh sheet via "Custom Views" for a set of calves sorted by ID. The weights and other measurements can be taken and then the weigh sheet is in the same order as the entry screen. The Wn Date along with other information is retained as you go from one calf to the next. The "Submit and Get Next" button when clicked enters the data on the current calf and goes to the next calf on the list.
Note a weaning record can be deleted by clicking the "Delete Weaning Record" button. Once the record is deleted it can be re-entered correctly.
Yearling Data Edit
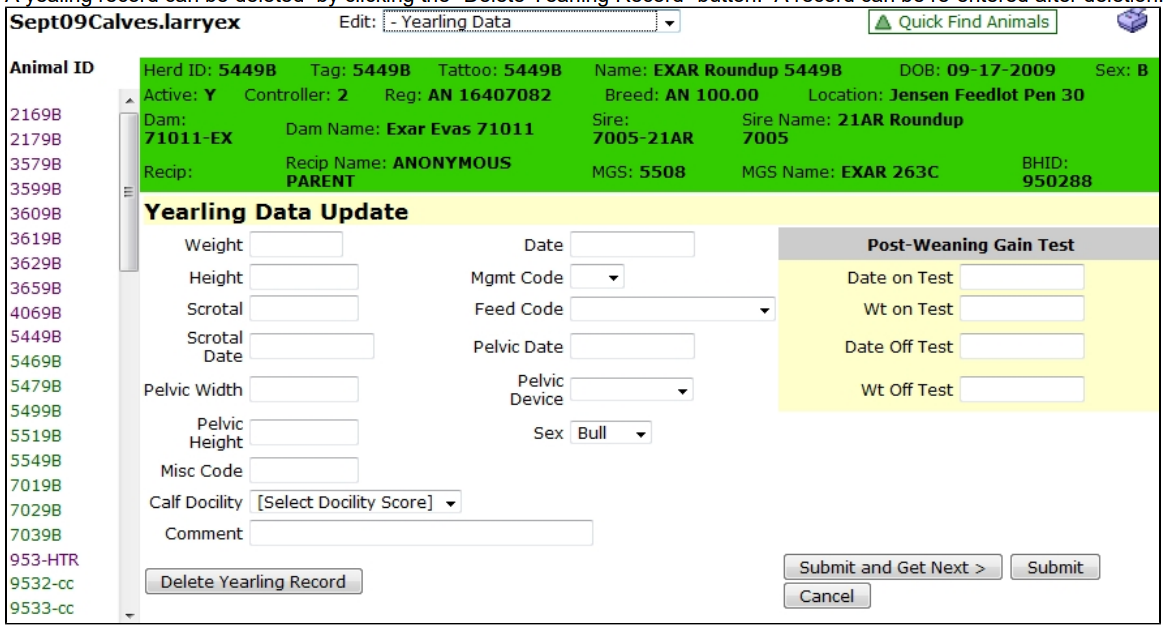
The Yearling Data Edit / Entry screen provides for the entry of various yearling information on an animal. The boxes to be filled in are self-explanatory. Note the various drop downs for Mgmt Code, Feed Code, Pelvic Device, Sex, and Calf Docility. There are appropriate boxes for a Post-Weaning Gain Test information which is separate from an individuals yearling weight. Note most breed associations accept a yearling weight thus even though you may enter the Post-Weaning Gain Test fields you still must enter a yearling weight which will then be presented to the breed association.
The information in the screen for items such as Date hold from one individual to the next. The "Submit and Get Next" button moves automatically down the list of calves. A weigh sheet should be developed using "Custom Views" sorted by ID to enhance the efficiency of data entry.
A yealing record can be deleted by clicking the "Delete Yearling Record" button. A record can be re-entered after deletion.
Ownership Edit
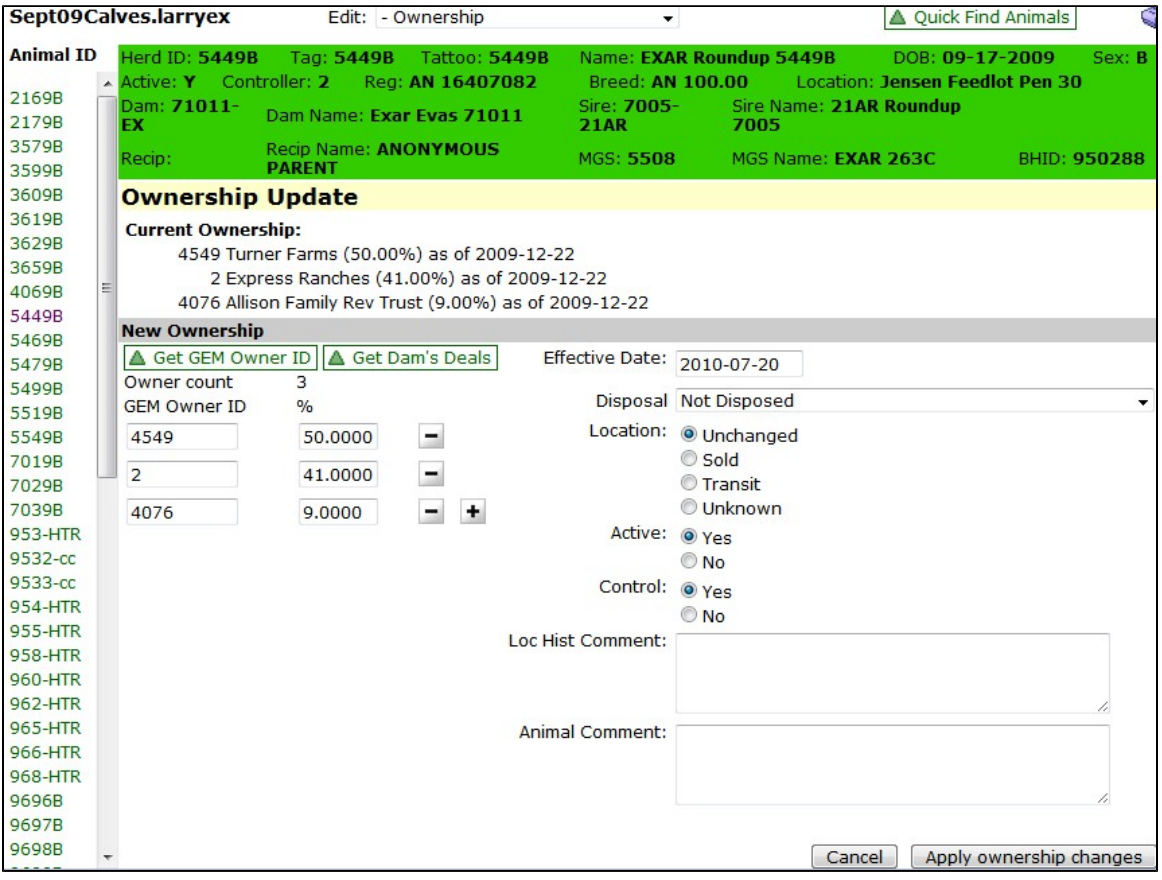
The Ownership Edit / Entry screen allows you to change the ownership on a animal you control. This screen only provides for ownership changes and does not involve sales/purchase information (see Edit Sales and Purchases). The screen allows you to put in single and multiple ownerships. The example below is owned by three different entities. Note the ownership percentages must total exactly 100.
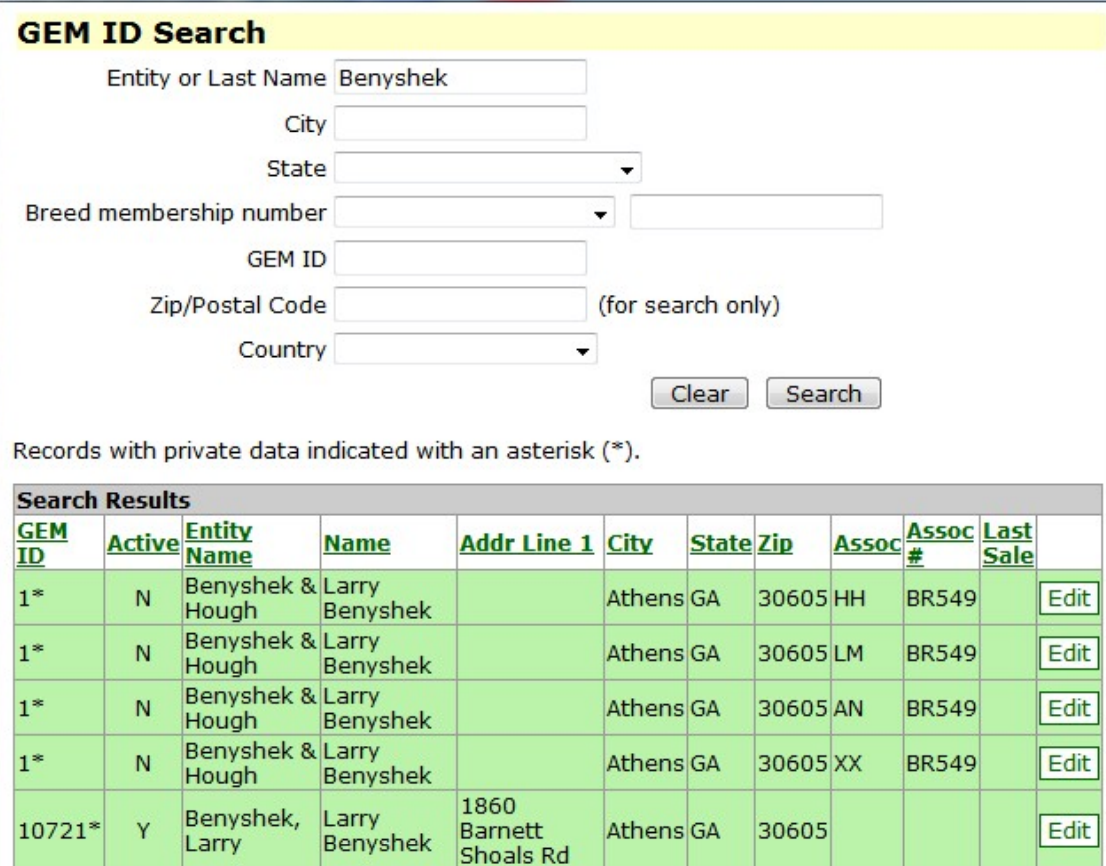
Ownership can be changed by replacing the current GEM Owner ID with the new GEM Owner ID. The plus and minus sign boxes add or remove GEM ID and Percentage boxes to and from the screen. Most likely you will not know the GEM Owner ID thus you will need to use the "Get GEM Owner ID" link which will allow you to search the people portion of the database (see second screen shot below and also discussion on Find/New People). The GEM ID Search will return the Ranch/Farm Name or the Last Name of the person you are looking for in the database. This is a 'contains' search so enter only basic information such as the person's last name or the first part of the ranch name. Note that the entry Benyshek returns both Larry Benyshek and Benyshek and Hough. Benyshek and Hough show four times (GEM ID = 1) because they have four different Association numbers in the database.
The Effective Date box is critical to this operation. The box defaults to today's date thus you will have to enter the appropriate date.
Note : The Effective Date must be later than the current ownership date. In the example below the new Effective Date would have to be after 12-22-2009.
There is a drop down for entering a Disposal code. The Location radio buttons allow for changing to a limited number of locations. Active and Control may be changed in this screen. A Location History Comment and/or a general Animal Comment may be entered from this screen.
You must click the "Apply ownership changes" button at the lower right-hand corner of the screen for the data to be entered into the database.
Generic Weights Edit
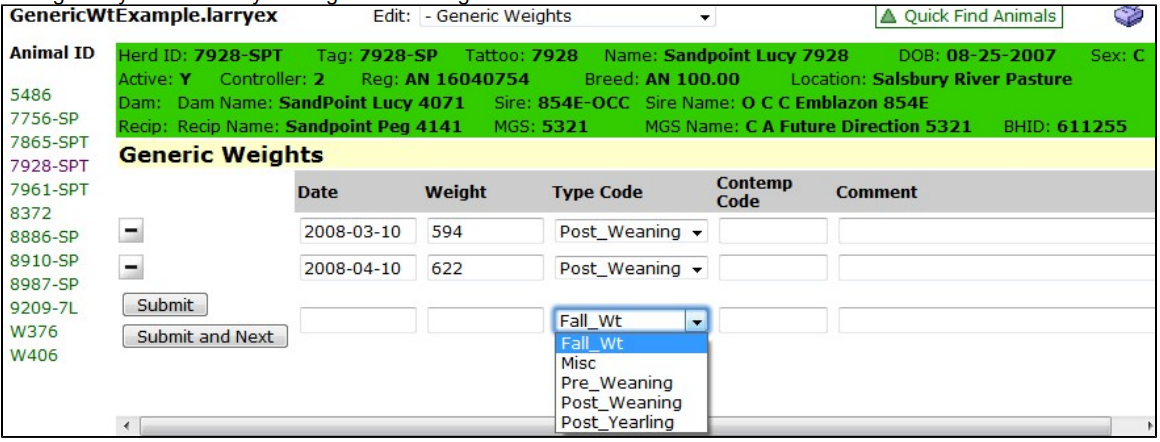
The Generic Weights Edit / Entry screen provides the opportunity to record multiple weights on an individual animal. For example, this screen might be used for monthly bull test weight recording. The operation is one of entering a date and a weight. A Type Code can be associated with the weight via clicking the appropriate code in the drop down. You can set up a Contemporary code for these weights and insert a comment.
A weight may be deleted by clicking the minus sign to the left of the record line.
You must click either "Submit" or "Submit and Next" for the data to be entered into the database.
Implant Frozen Embryo Edit
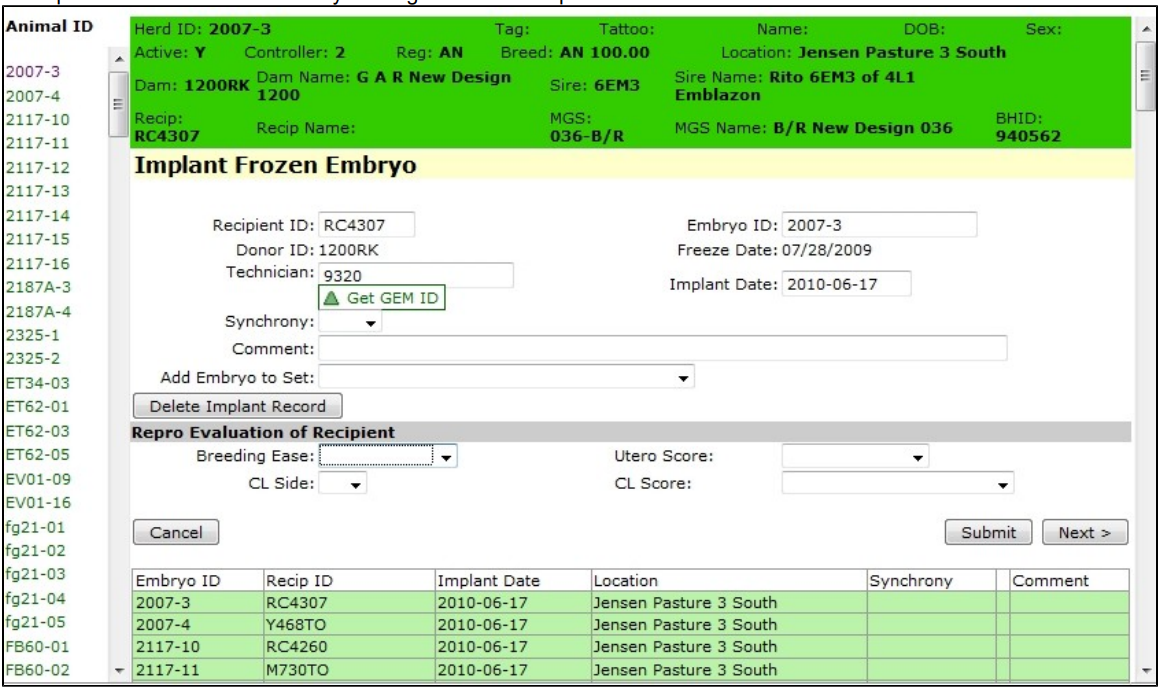
The Implant Frozen Embryo Edit / Entry screen is used to implant embryos into specific recipient cows. You must have the embryos to be implanted in a set. Note that in GEM embryos are records with IDs exactly like live animals. Therefore, before the Implant Frozen Embryo screen can be used you must create the embryo records which is accomplished in the same manner as a new animal record (see New Animal Screen). In addition, recipient females must be active on GEM and designated as recipients (see Edit Base Data). Any female registered or commercial can be designated a recipient. Commercial recipient females can be added to the database via the New Animal screen.
The operation to implant an embryo is fairly straightforward as seen in the screen shot below. Simply click on the embryo and it will appear in the Embyo ID box. You then enter the active Recipient ID and the Implant Date. You can enter a technician GEM ID if you wish to record that information. The freeze date will appear automatically if the embryo record is created correctly. Also the Donor ID will show automatically. Note that the green stripe at the top of the screen shows pertinent information about the embryo.
There are boxes with drop downs to enter data on the recipient female.
You must click "Submit" or "Next" for the data to be entered into the database. Once either of these button is clicked the record will show at the bottom of the screen.
An implant record can be deleted by clicking the "Delete Implant Record" button.
Pregnancy Check Edit
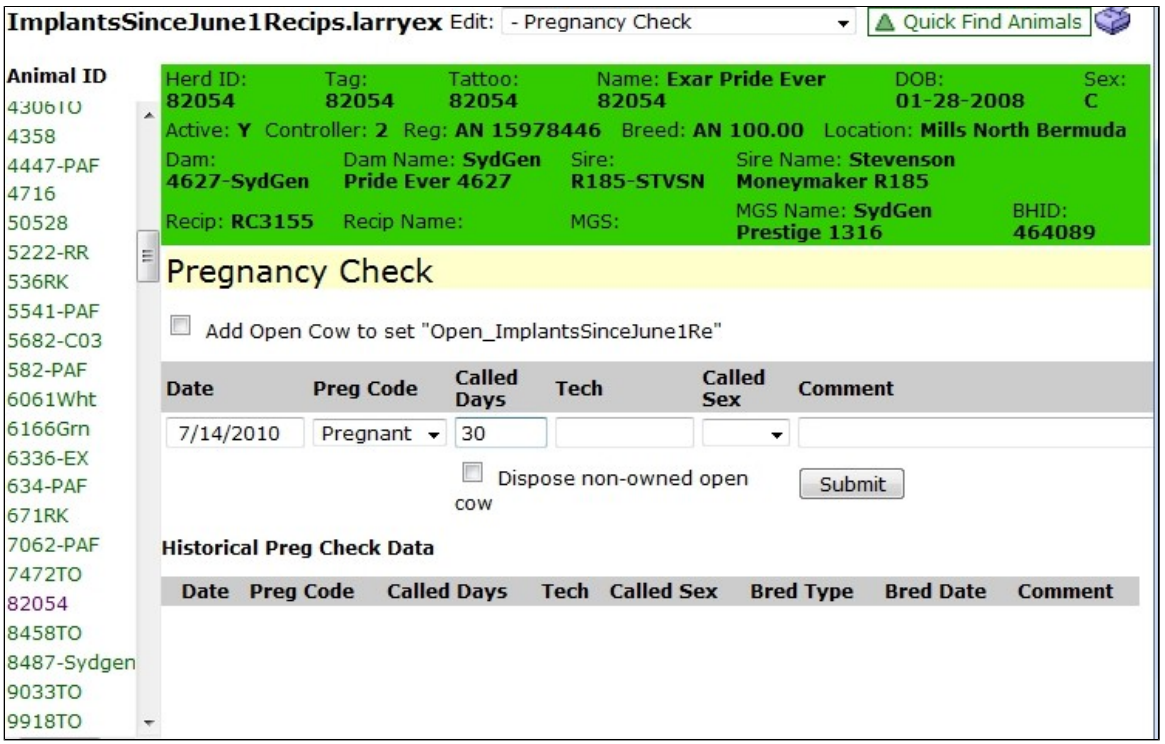
The Pregnancy Check Edit / Entry screen provides for the entry and editing of pregnancy testing data. This is a two screen edit/entry. The first screen shown below appears on clicking the appropriate Animal ID. The boxes are filled in accordingly. As seen in the example below this cow was checked on 7/14/2010 and diagnosed pregnant with a Called Days equal 30. A technician GEM ID may be entered along with a called sex.
The check box 'Add open cow to set' will automatically create a set of the open cows. If the operation is using a cooperator herd the cow may be disposed by checing the box 'Dispose non-owned open cow'.
If the cow is open and the preg code open is entered into the Preg Code box clicking the "Submit" button finishes the operation with an open code entered into the database. If the cow is pregnant as shown in the first screen below you are taken to a second screen (see second screen below) on clicking "Submit".
This second screen provides the opertunity to designate the appropriate mating for the pregnancy checked cow. If breeding and/or implant data has been entered the computer will pick the best mating based on the Called Days. In the example below the cow was artificially inseminated on 4/10/2010 and implanted with an embryo on 6/10/2010. The difference between the called days for the implant date and the check date is 11 days whereas the difference is 65 days for the AI date. Therefore the computer chooses the implant date as the correct mating shown with the highlighted radio button. You can override the computer's choice by highlighting another radio button if you know the computer is in error. In the example below if you choose to highlight the AI mating radio button you would also check box the Dispose Embryo which would set the Embryo to Inactive. Clicking "Submit" in this second screen enters the appropriate mating for the pregnancy into the database. It should be noted that the pregnancy check data is the basis for and drives the Due Date Report and the Calving Worksheet Report.
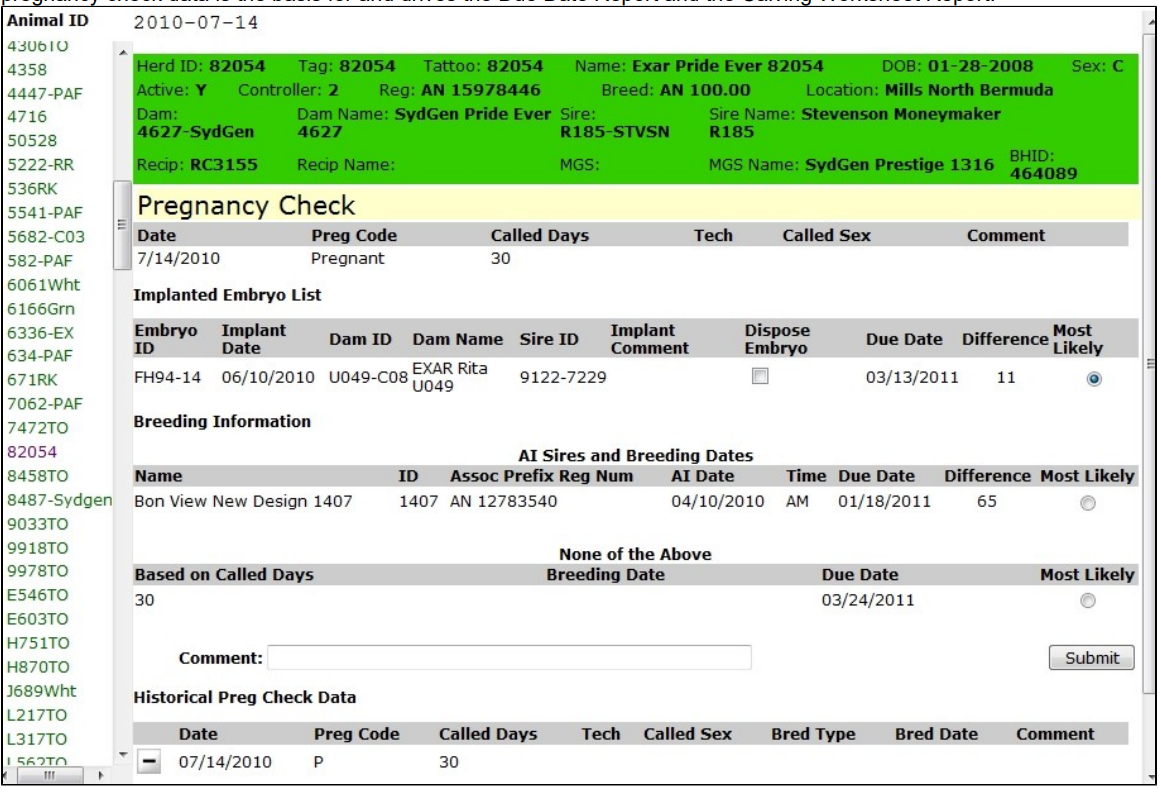
Note that a pregnancy check entry may be deleted by clicking the minus sign next to the appropriate line in the Historical Preg Check Data at the bottom of the first screen.
Breeding - Heat & AI
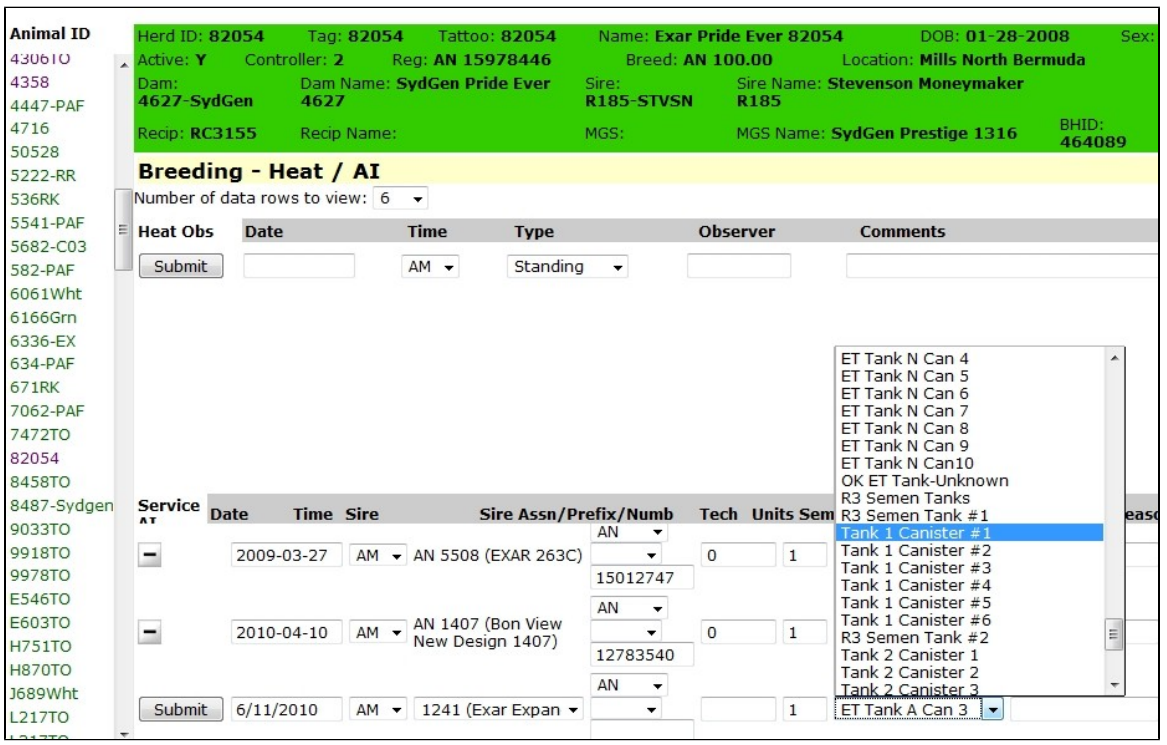
The Breeding - Heat & AI data Edit / Entry screen shown below allows you to enter or edit Heat (Estrus) information on the top half and Artificial Insemination (AI) data into on the bottom half of the screen. The boxes are fairly self-explanatory. Note that the AI service history is provided (up to ten previous services). You enter a date (6/11/2010 in the example below), select a sire from the drop down, enter a technician GEM ID (not required), number of units of semen used and the location from which the unit of semen was taken. The location field requires that semen inventory be set up prior to entering the breeding record (see Semen Inventory). Clicking the "Submit" button enters the record into the database and automatically decrements the semen inventory for the selected bull and location if the semen inventory system is in place. A breeding season can be designated if the season has been set up prior to the entry of the breeding record (see Edit Breeding Season under Administration). An AI service record or a Heat record may be deleted by clicking the Minus sign next to the record. It should be noted that there are two Batch screens available for entering AI breeding data (see Batch screens discussion).
Breeding - Observed & Pasture
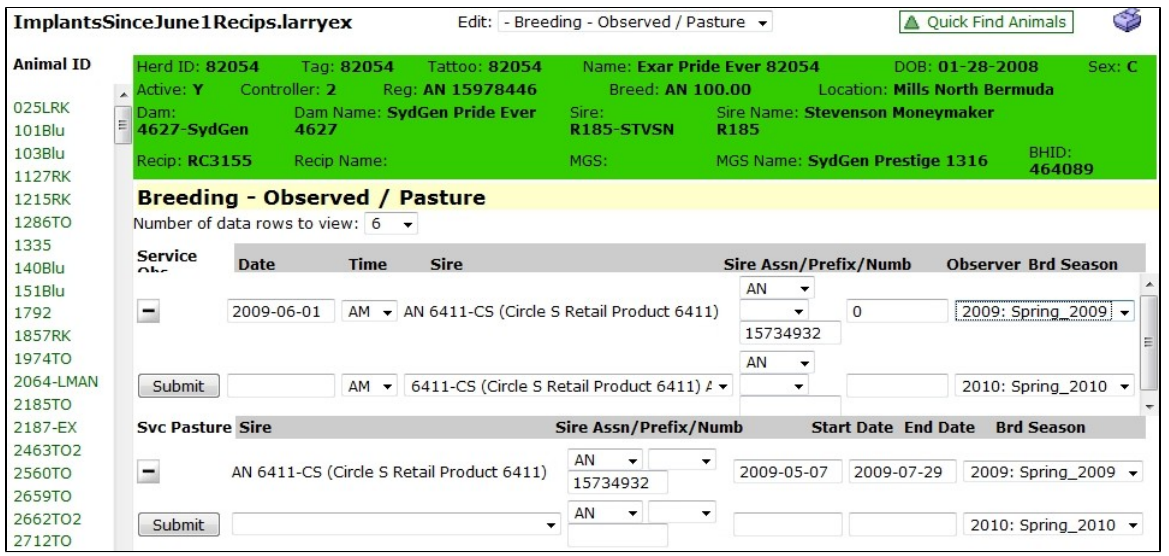
The Breeding - Observed & Pasture data Edit / Entry screen shown below allows you to enter or edit for visually observed breeding on the top half of the screen and Pasture Mating interval on the bottom half of the screen. For an observed mating you simply enter a date, time (am or pm), the sire from the drop down. If the sire is not in the drop down you can enter his registration number. The oberver's GEM ID can be entered and a Breeding Season can be selected. You must click "Submit" to enter the data into the database.
The bottom half of the screen allows for editing of a natural service sire interval for an individual cow. This will usually be done as an edit to correct a service interval. Entry of the natural service sire intervals should be done via a Batch Job (see Batch Jobs Pasture Breeding). Note that the cow's history is shown in the screen. You can delete a historical record by clicking the minus sign next to the record.
In the example screen below the cow was exposed to the given sire from 5-7-2009 to 7-29-2009 with an observed mating on 6-1-2009.
Donor Functions Edit
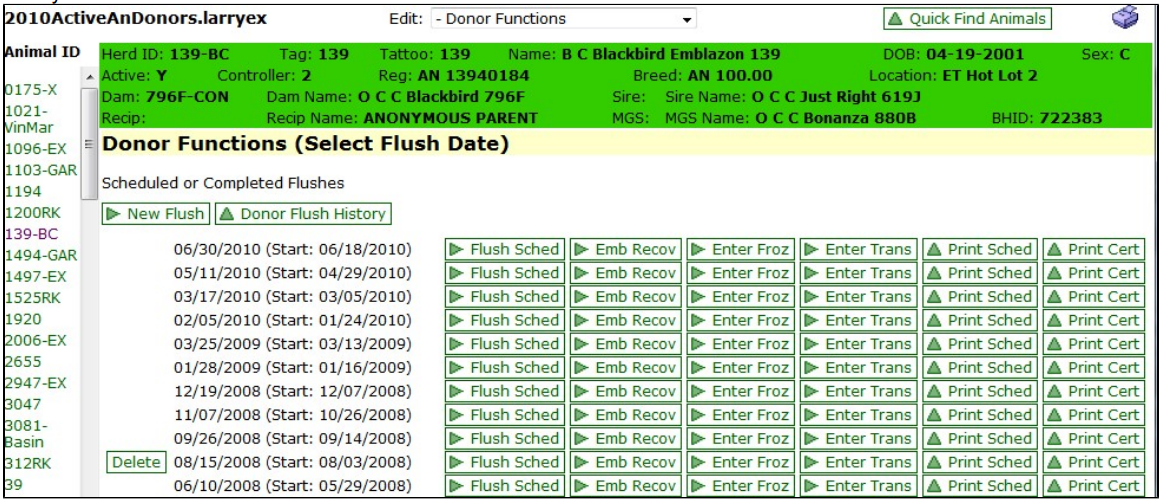
All Donor Functions Edit / Entry begin with the screen shown below. From this base Donor Functions Edit screen you can create a schedule for a New Flush or print a Donor Flush History for a cow. You can also edit all the different aspects of an existing schedule or an existing flush for a donor dam (see discussions for Flush Schedule, Embryo Recovery, Enter Frozen, Enter Transfers). You can print a donor schedule as well as ET certificate.
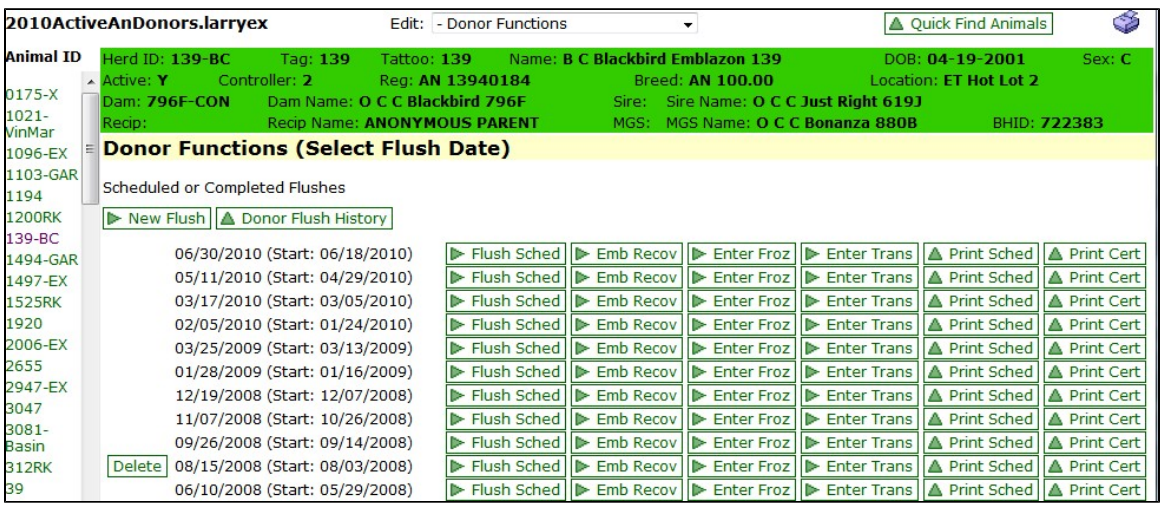
The screen allows the client to either start the process of scheduling a donor cow or entering data from a previous flush from a flush record sheet. The process of creating a flush schedule begins by clicking "New Flush" (see Flush Schedule Edit). If the flush schedule has been created it can be edited by clicking the "Flush Sched" button. Clicking the "Emb Recov" takes you to the flush entry screen where the flush record can be created or edited for the designated donor cow (see Embryo Recovery Edit). Clcking the "Enter Froz" button will bring up the enter/edit frozen embryos where a record is created for each embryo (see Enter Frozen Embryos Edit). The "Enter Trans" button provides a screen for entering/editing fresh embryo transfers with a record being created for each embryo transferred (see Enter Transferred Embryo Edit).
Flush Schedule Edit
The Donor's Flush Schedule Edit / Entry screen (line abbreviation Flush Sched) allows you to set up all aspects of a scheduled flush. The screen below shows the sample schedule. The screen must be filled in regardless of whether the donor is actually being scheduled through the GEM system. If the cow is actually being scheduled through GEM then there will be a Heat Date and an AI Date which have been entered in the Edit Breeding Heat/AI screen. A Super Ovulation Protocol would be selected from the drop down and this will set the recovery date which can be overriden by the technician. The "Submit" button must be clicked before the schedule is entered in the database. The process once the recovery occurs is the same throughout the remaining screens. The schedule can be printed for field use by clicking the "Print Schedule" button (see Print Schedule to view a sample printed schedule).
Much of the time ET data is entered from flush sheets received from a commercial embryo transfer unit or an ET technicians computer. In this case some basic information must be entered into the Flush Schedule screen. A default Super Ovulation Protocol will show in the drop down thus you do not have to worry about that particular box. You must enter an Actual Recovery Date. There will be box (not shown in the screen below) for Start Date which is entered as the date 11-12 days prior to the Actual Recovery Date. A Flush Sire should be selected fromt he drop down (always make sure all herd sires are entered, see Edit Private Animal Data). Click "Submit" and the schedule is created. Note that a "Delete" button will show at the line for each flush that has not completed or if the flush actually produced no embryos. Clicking this "Delete" button will remove the entire flush record if the user wishes to do so.
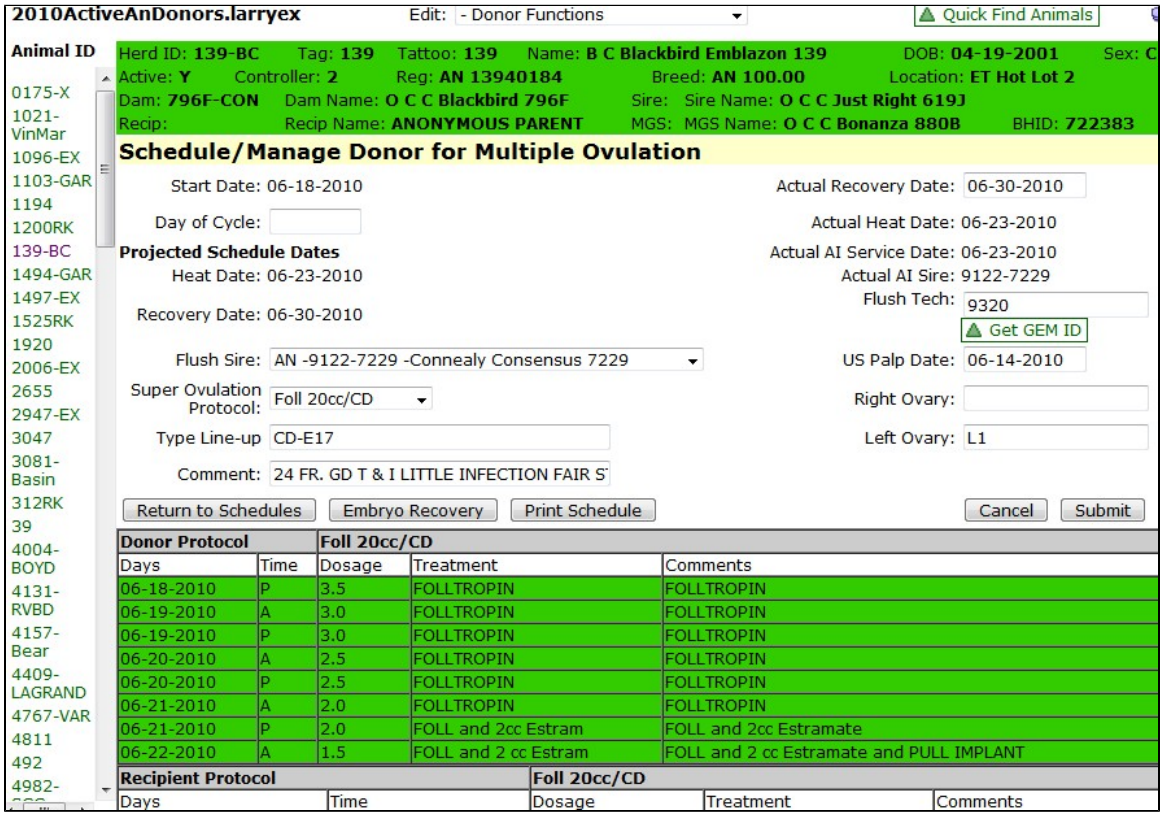
The next step is to create the donor cow's flush record which is initiated by clicking the "Embryo Recovery" button (see Embryo Recovery Edit).
Embryo Recovery Edit
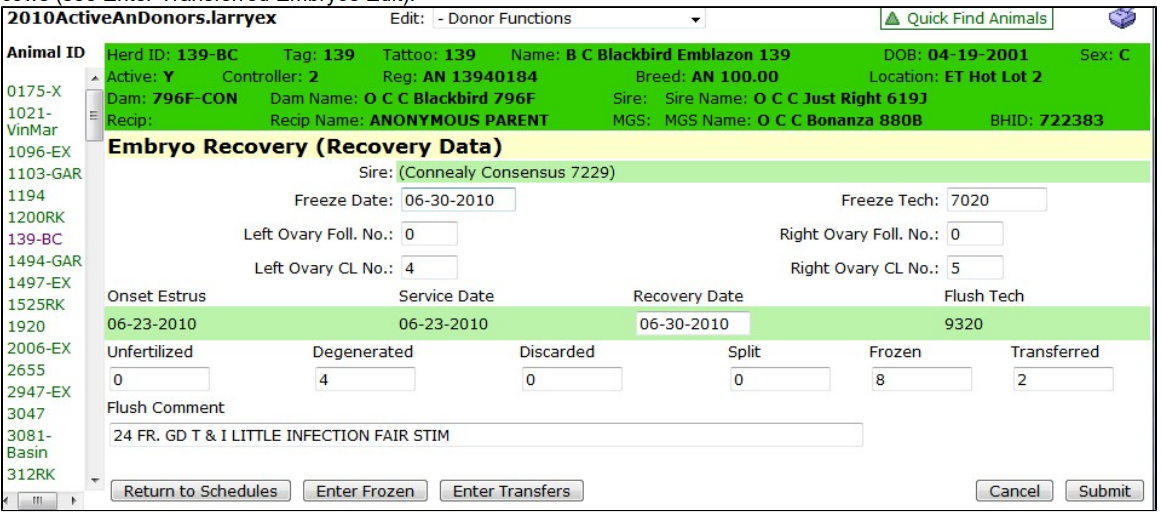
The Embryo Recovery Edit / Entry (abbreviated Emb Recov) screen shown below creates the donor cow's flush record. Note that some information appears in the screen from previous entered data. The user should enter the appropriate numbers for the boxes titled: Unfertilized, Degenerated, Discarded, Split, Frozen and Transferred. A flush comment can be entered. In the example below there were 4 degenerated, 8 frozen and 2 fresh transferred embryos in the flush. You must click "Submit" for the flush record to be entered into the database. Once the information is entered the client can click one of the three buttons to start the next phase of the entry. "Return to Schedules" simply takes you back to the first screen, Donor Functions. Clicking "Enter Frozen" takes you to a screen where individual embryo records are created for the flush (see Enter Frozen Embryos Edit). The "Enter Transfers" button provides a screen for creating embryo records and implanting them into recipient cows (see Enter Transferred Embryos Edit).
Enter Frozen Embryo Edit
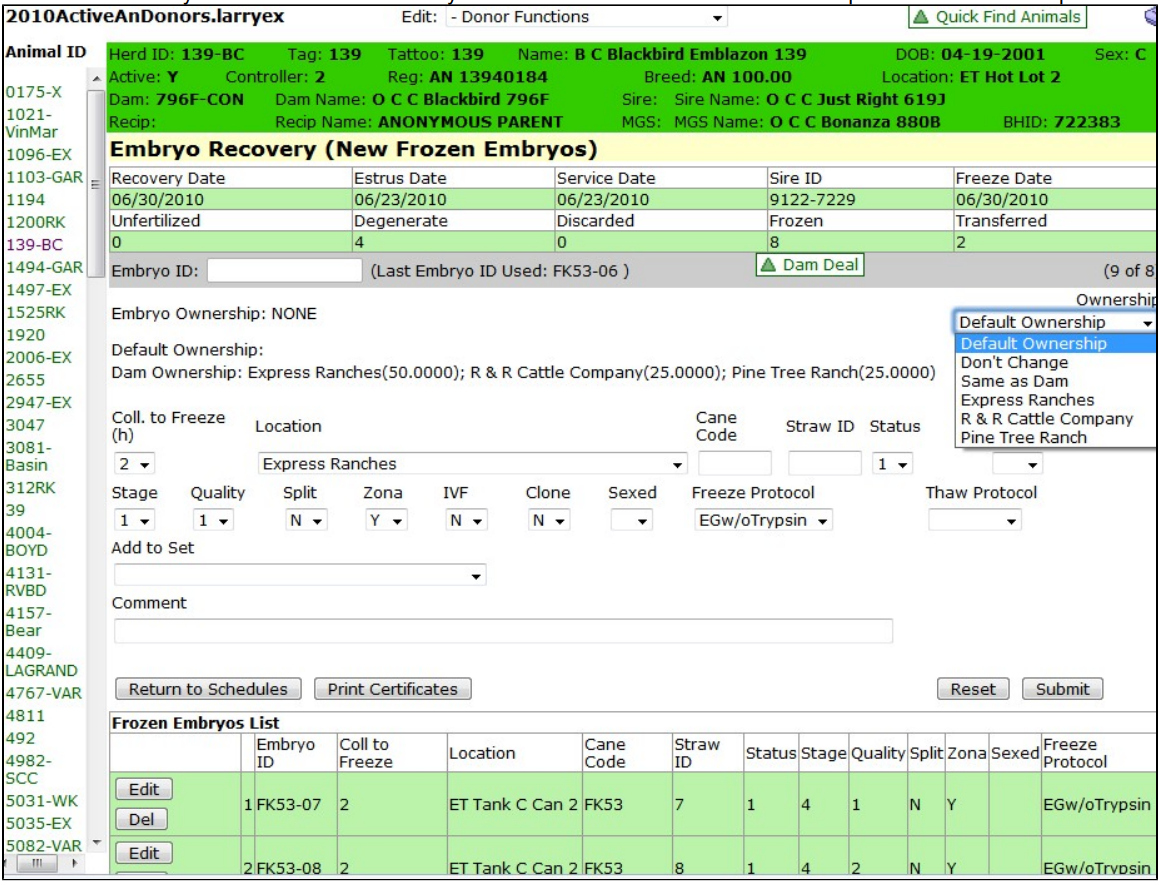
Individual embryo records are created in the Enter Frozen Embryo Edit / Entry screen (abbreviated Enter Froz). In GEM embryos are accounted for as records just like live animals. An embryo can be thought of as a calf that has not been born yet and resides either in a liquid nitrogen tank or a recipient cow. The screen below provides an example where 8 embryos were created and stored in a tank.
The first box that must be filled in is the Embryo ID box. You can delvelop any embryo identification system you wich to use keeping in mind that duplication is not allowed on GEM. In the example below the client elected to use a system of cane code and straw ID (FK53-07). Some operations use a combination of the donor dam ID and the Sire ID. For example the FK53-07 embryo shown below could have been ID'd 139-BCx7229-07 which would indicate the seventh embryo from the flush mating 139-BC and sire 7229. Any system of identification will likely work but continuity will aid you in finding embryos via searches and queries.
Ownership fo the frozen embryo is established in this screen. Note in the drop down you have choices with respect to ownership. The default is the log in ownership.
The collect time to freezing can be entered in hours. The Location box is a drop down and if the tank and its canisters have been created as locations the embryo can be automatically entered into that location (in the example FK53-07 is in ET Tank C Can 2). Note that in Administration you can temporarily set the Location to hold a particular location such as Tank C and its canisters. The Cane Code and Straw ID are entered along with the the Status and Wash No. if available. In the next line you enter Stage, Quality, Split, Zona, IVF, Clone, Sex (if embryos are sexed), Freeze Protocol and Thaw Protocol.
The next line allows the technician to add the embryo ID to a set (see Sets discussion) which can be helpful in maintaining the accuracy of the embryo inventory.
You click the "Submit" button and the embryo record is created in the database. Note that all the values in the boxes hold as you proceed to the next embryo entry thus minimal typing is necessary.
You can Edit an embryo record if you happen to make a mistake by clicking the "Edit" next to the record. The record can be deleted using the "Del" button. Note you can not delete the embryo record from this screen if it has been implanted via the Edit Implant Frozen Embryo screen.
Enter Transfered Embryo Edit
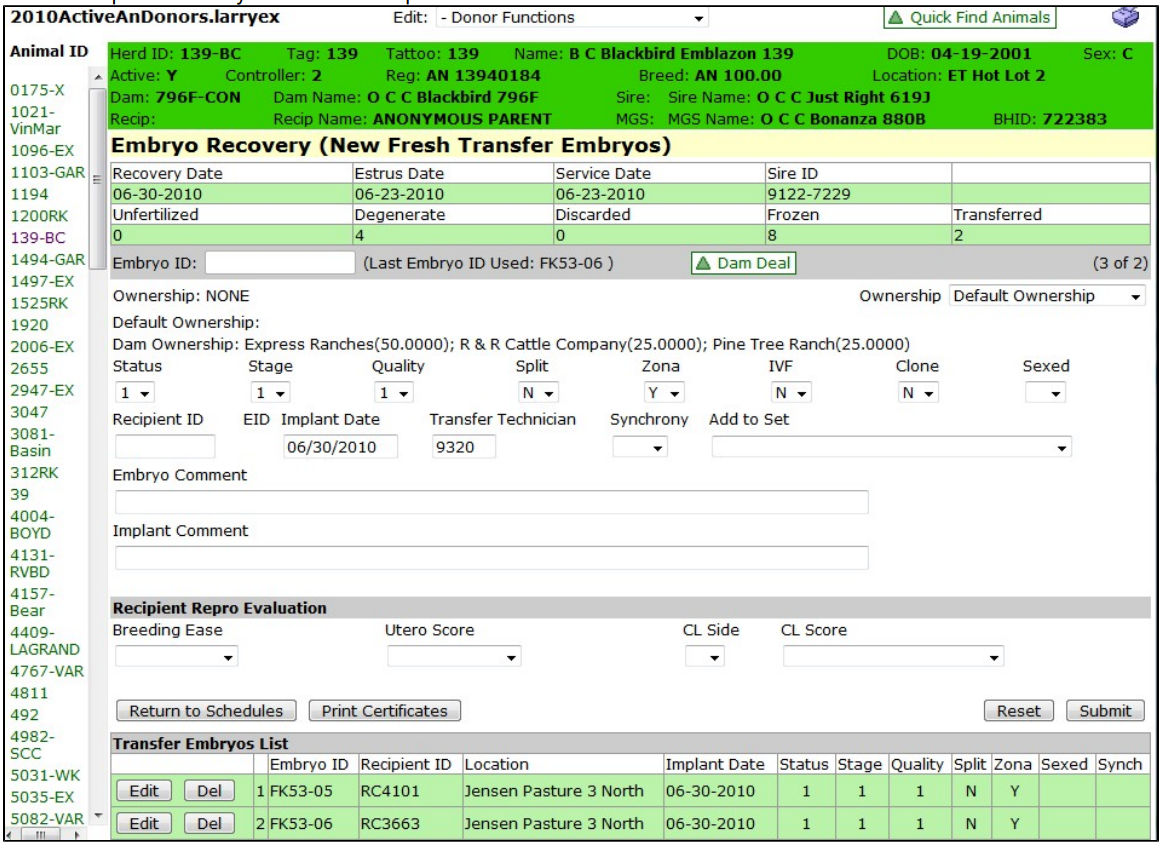
The Enter Transfers Embryo Edit (abbreviated Enter Trans) screen allows you to enter / edit embryos that were fresh transfers into recipient cows. Note that implanting frozen embryos must be done in a different screen (see Implant Frozen Embryo Edit screen). In the screen shown below each embryo has a record created with an ID. The ownership of the fresh implant can be set using the ownership drop down to the right of the screen. Ownership of the fresh implant will default to the ownership of the dam. Boxes are available for Status, Stage, Quality, designation for a Split embryo, Zona, IVF, Clone and sex. A recipient ID must be entered and the recipient must be an active female on GEM. Implant date must be entered. The transfer technician can be entered as a GEM Entity ID. A box is available for Synchrony. Much of the time an empty set will be created ( see New Empty Set) and the implanted embryo IDs can be added to the set via the drop down designated "Add to Set". Comments can be entered.
Some operations will do a reproductive evaluation on the recipient cow at the time of implanting an embryo. The screen provides for entering this data on a recipient cow.
Once the 'Submit' is clicked the embryo record shows at the bottom of the screen This record can be edited by clicking the 'Edit' button or deleted by clicking the 'Del' button.
Note the implanted embryo follows the recipient cow's location.
Print Flush Schedule
The 'Print Sched' link prints a PDF document with all the pertinent information for a flush including information on the dam, the flush schedule, embryos collected and frozen or fresh transferred.
Print Embryo Cert
The 'Print Cert' link in the Donor Functions screen prints a PDF document of the official AETA report showing all the Embryo Transfer Recovery information, all Fresh Embryo Transfers and all Frozen Embryos resulting from that specific flush.
Deals Edit
The Deals Animal Edit / Entry screen allows you to keep track of information like partnership arrangements for individual animals. This usually pertains to donor cows; however, the screen may be used for any animal. Once the information is entered into the Description box and the "Submit" button is clicked the information then shows in other screens such as the Edit Donor Function screens. This can help the embryo transfer technician apply the proper ownership to embryos being entered into the system. The screen provides for a starting and ending date. A Deal may be deleted by clicking the minus sign next to the date box. Usually a formal document is maintained elsewhere at the ranch/farm.
Private Animal Data Edit
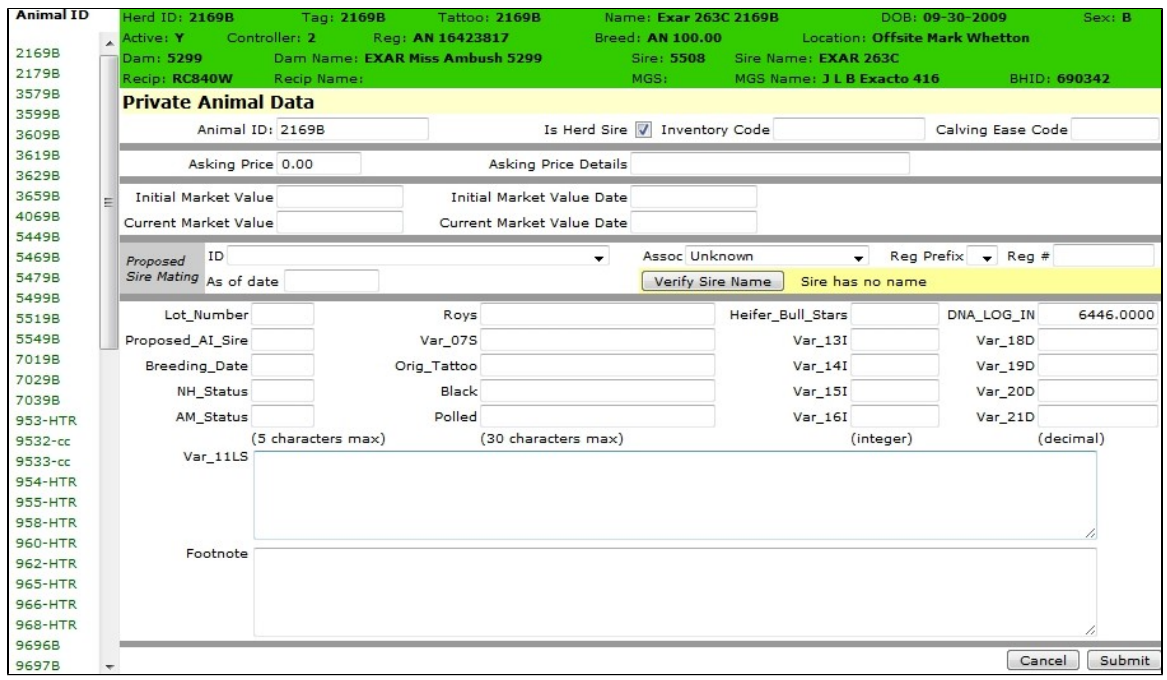
The Private Animal Data Edit / Entry screen is a mutifunctional screen. The first operation most clients will do with this screen is to create herds sires that show up in the various screen drop downs where sire might need to be entered (see New, Edit Breeding Heat/AI for examples). To make a bull a herd sire in the various drop downs simply check box the Is Herd Sire as seen in the screen shot below and click the "Submit" at the bottom right-hand corner of the screen. In addition, to setting up herd sires this is the screen where you can give any animal an ID which will be associated with your log in. You do not have to control the animal to give it an ID which can be helpful for AI herd sires where the owner's ID is not the ID you wish to use.
There are several boxes for entering value and price information on an animal. The Asking Price can be established for an animal and recorded in the database. Some clients create current market values for animals based on an appraisal and these appraisal valuations can be recorded in the database.
The screen can be used to create a proposed sire mating list for a group of females. In this case your current set would need to be the group of cows to which you want to assign a particular sire(s). There is a printed report associated with this operation.
The lower half of the screen shows the user defined variables to which a client can attach a name. These represent user defined columns in the database which can be used for any items which the GEM developers have not accounted for at the present time. These can be considered temporary or permanent. In most cases if the data is being collected by several clients the GEM developers will create a permanent space in the database accessible by all clients. Naming of the user defined variables or columns is done in Administration (see discussion on Administration). Several of the variables in the screen shot below have been named.
Finally, there is an entry box for private footnotes. These are not the same footnotes as seen in Auctions (see discussion on Auctions). The Edit Private Animal Data Footnotes would show up in Private Treaty Invoices and in the Sale Catalog Reports (See Reports discussion).
Remember you must click "Submit" before any data actually enters the database.
Simulated Mating Setup Edit
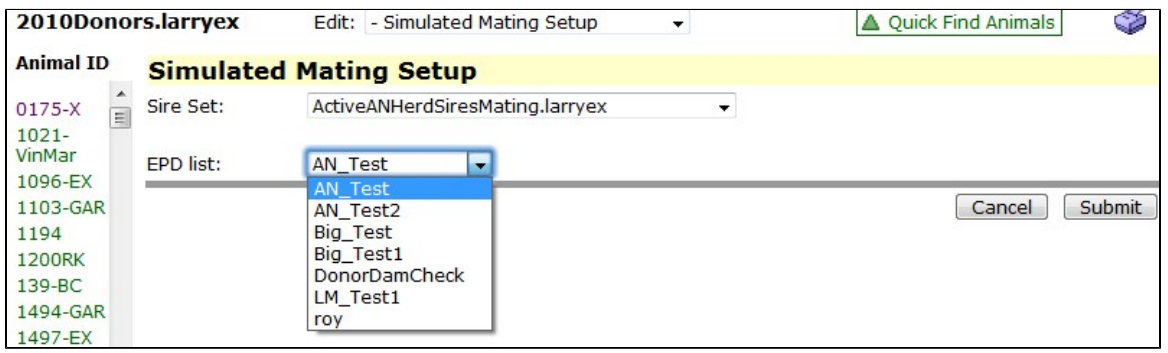
The Simulated Mating Setup Edit / Entry screen allows you to set up the parameters pertaining to the Simulated Mating screen which ultimately provides pedigree estimates of the EPDs for calves from a set of cows and a set of bulls. You only need to do this once per GEM session. Clicking on Edit Simulated Mating Setup takes you to the first screen shown below. In this screen two operations are performed 1) select the set of sires (see Set Building) you wish to compare with the set of cows showing under the Animal ID column and 2) the EPD list you wish to view (see Administration for details on building the list of EPDs). Clicking 'Submit' brings up the second scree in the operation as seen below.
In this second screen you enter a date which will be the as-of-date for the proposed matings. Clicking 'Submit' in this screen moves you to the last screen in the Simulated Mating Setup. In this third screen shown below you go to the Edit box at the top and select "Simulated Mating" which will bring you to the last screen below.
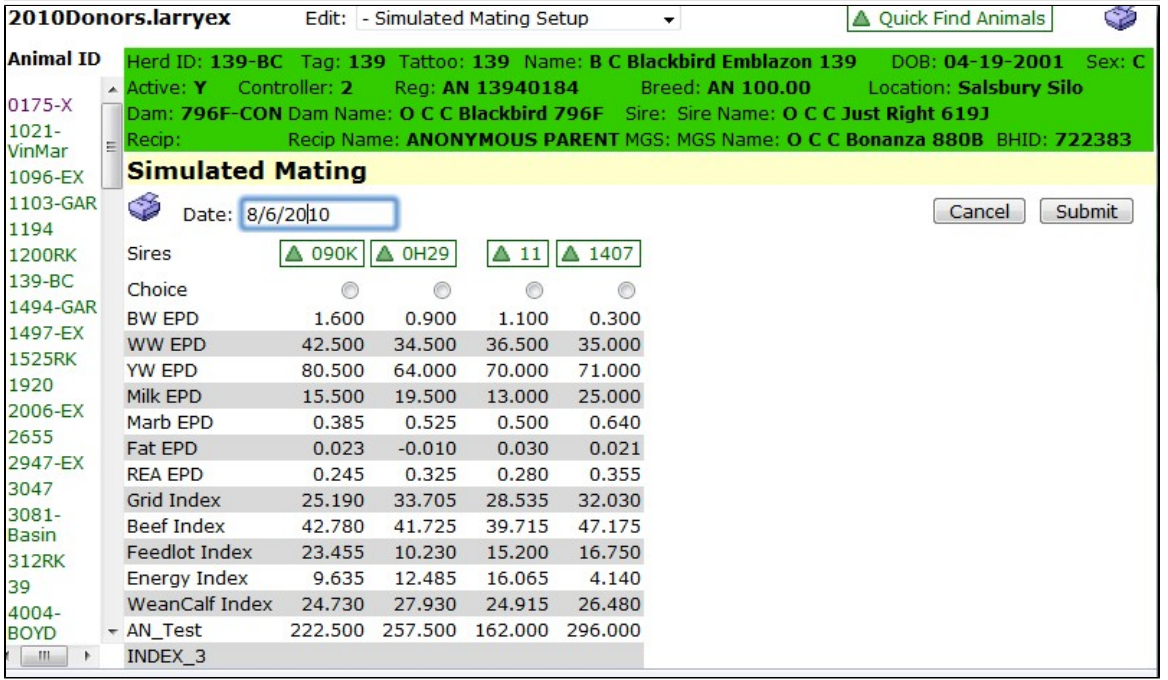
In this last screen you can now click through the cows and the projected EPDs for each cow and bull combination is computed. You can print the screen. Clicking on the sire ID will pop up a three generation pedigree for the proposed mating. If you wish to select a bull for a proposed mating as of the date shown in the box simply highlight the radio button for the bull and click 'Submit'. The proposed mating is entered into the database and there are three reports which accompany the Simulated Mating function (see Reports--Simulated Mating EPDS, Proposed Mating Worksheet and Proposed Mating Reports). Note that the selected proposed sire for a particular cow will stay in the database as of the date in the box until another proposed mating is entered either through Simulated Mating or Edit Private Animal Data.
Simulated Mating Edit
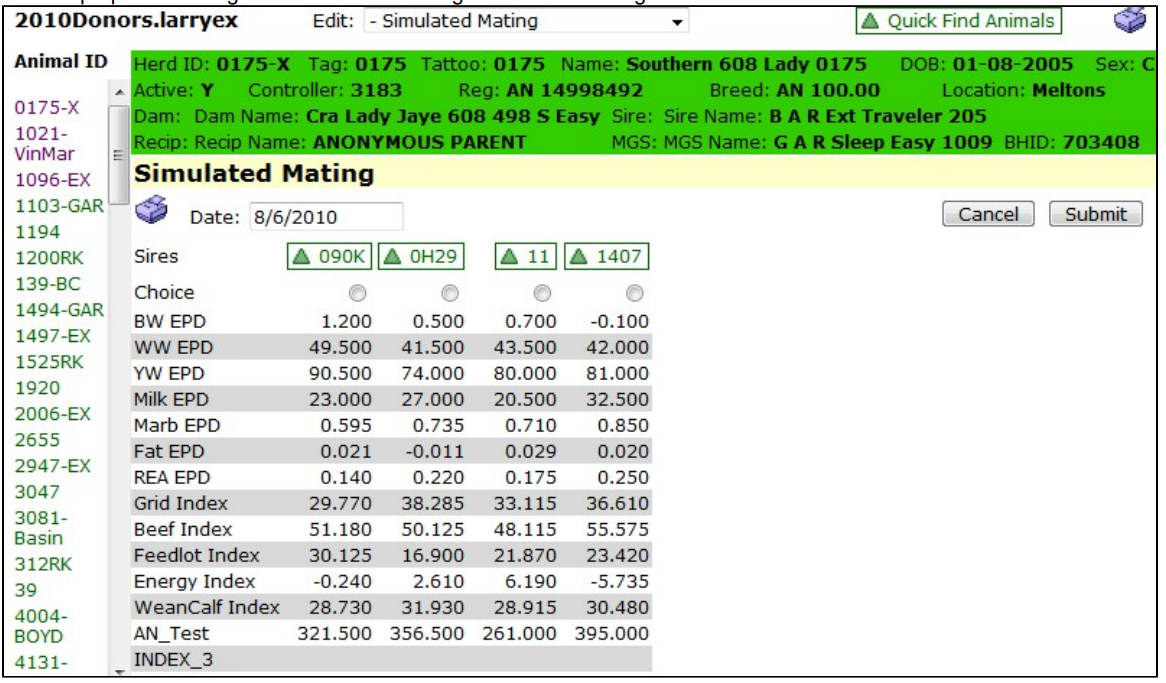
The Simulated Mating Edit screen is the final step in the simulated mating workflow. It is reached by completing the Simulated Mating Setup (selecting a sire set and EPD list) and then choosing "Simulated Mating" from the Edit dropdown at the top of the screen.
The screen displays a matrix of estimated offspring EPDs for the current dam against each sire in the selected sire set. Each column is a sire; each row is an EPD trait from the selected EPD list. The value in each cell is the estimated offspring EPD, calculated as the average of the sire's and the dam's EPD for that trait:
Estimated Offspring EPD = (Sire EPD + Dam EPD) / 2
Clicking a sire's ID opens a three-generation pedigree popup for that potential mating. You can page through cows in your active set using the navigation controls to compare each dam against the same group of sires.
To record a proposed mating, select the radio button for the desired sire and verify the date in the "As of Date" box, then click Submit. The selected sire and date are saved to the cow's private record as the proposed AI sire mating. The proposed sire remains on record until it is replaced — either by another simulated mating submission or by editing the animal's private data directly (see Edit Private Animal Data).
There are three reports that accompany the Simulated Mating function: Simulated Mating EPDs, Proposed Mating Worksheet, and Proposed Mating Reports (see Reports — Simulated Mating).
Sales and Purchases Edit
The Sales and Purchases Edit / Entry screen is used to enter purchase or sale information for an animal. If ownership simply needs to be entered or corrected, you should use the Edit Ownership screen.
In GEM, a sales record and a purchase record are essentially the same thing, the only difference is that you are the buyer in a purchase record whereas you are the seller in a sales record. All sales / purchase data must contain both a seller and a buyer. It is extremely important that the current ownership of an animal be correct before creating a sale or purchase record. The latter can be examined in the Browse screen or the Ownership History report.
The Sales and Purchases screen can handle simple 100 percent sale of an animal or more complicated sales involving partial sales or multiple buyers. For any sale or purchase the first screen shown below is presented when you click on the animal for a sale or purchase record is to be created. In the example below the animal is owned by three entities. The first example will be a 100% sale such that all three entities are selling their portion of the animal. The Sale Date must be entered into the box which will default to today's date unless otherwise specified. The sale date must be later than any of the ownership dates shown for Current Ownership. A Sale Amount must be entered which can be zero if necessary. A Sale/Purchase Comment may be entered. A Location History Comment may be added along with an Animal Comment.
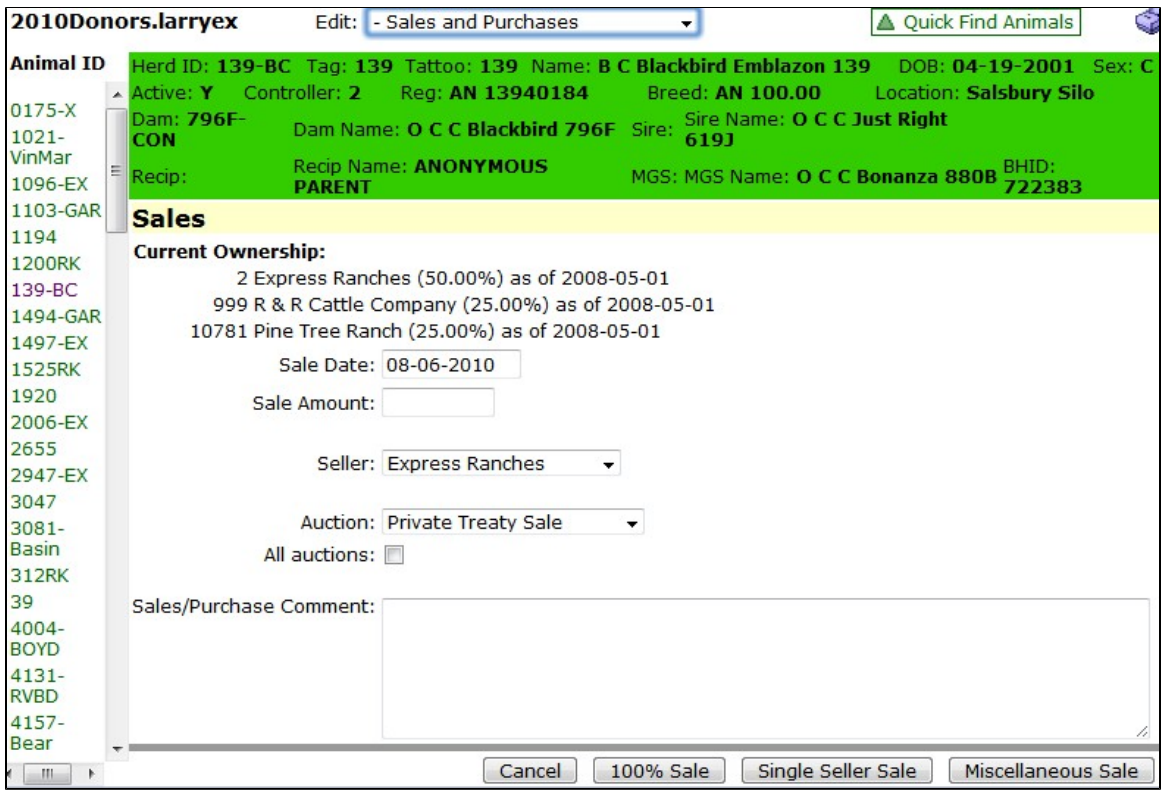
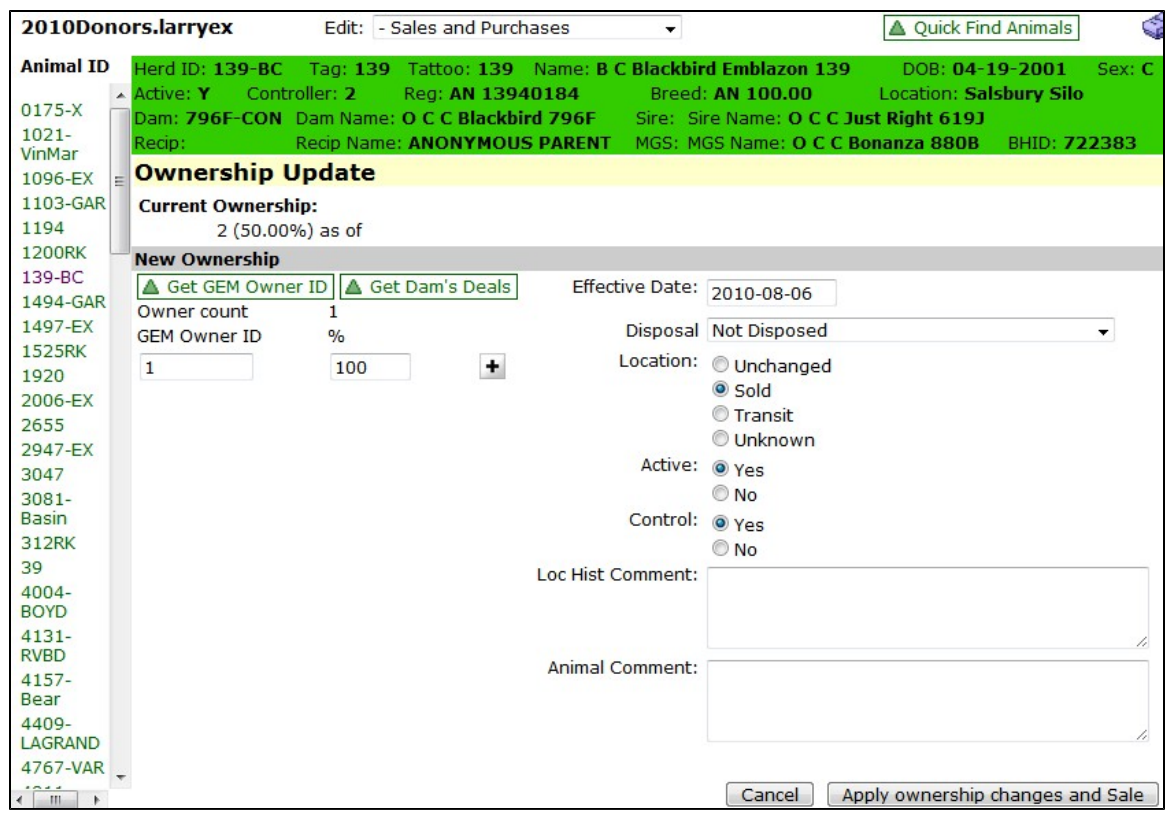
On clicking the '100% Sale' button a second screen appears as seen below for entering the new ownership. In this screen which is exactly the same as the Edit Ownership screen the new owner is established by entering the GEM Owner ID for the new owner. There is a 'Get GEM Owner ID' button which will take you to the people search (See People Find). On finding the new owner's GEM ID it is entered into the box as shown in the example (the GEM Owner ID is 1) and the percent box is 100. Note that the effective date is the sale date. There is a drop down for breed disposal codes. Also minor location changes can be made by highlighting the appropriate radio button. The sold animal may be made inactive and control may be relinquished by highlighting the appropriate radio button. Note that you should have completed any other record entries and changes before inactivating and relinquishing control of an animal. Also if the animal was sold to another GEM client you would usually transfer control to that GEM client (Batch Jobs-- Transfer Control). On clicking the 'Apply Ownership and Sale' button the sale amount is proportioned to each of the original owners based on their original ownership percent and the new owner in this case GEM Owner ID 1 is entered into the database.
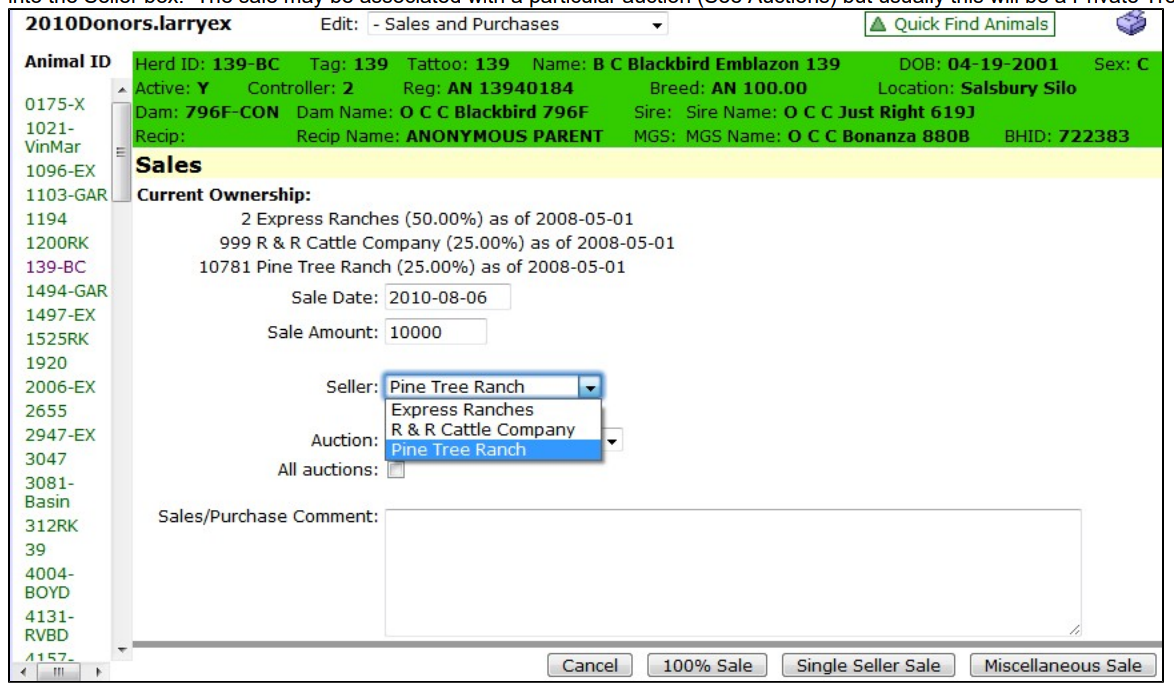
GEM allows a single owner of a multiple ownership animal to sell their portion of an animal. In this scenario you start with the same screen by clicking the animal in the list to be sold as seen below. In this example one of the three entities (Pine Tree Ranch) is selling their portion of the animal (25%). Sale Date is entered (always later than the current ownership) along with Sale Amount. From the drop down the seller is clicked into the Seller box. The sale may be associated with a particular auction (See Auctions) but usually this will be a Private Treaty Sale.
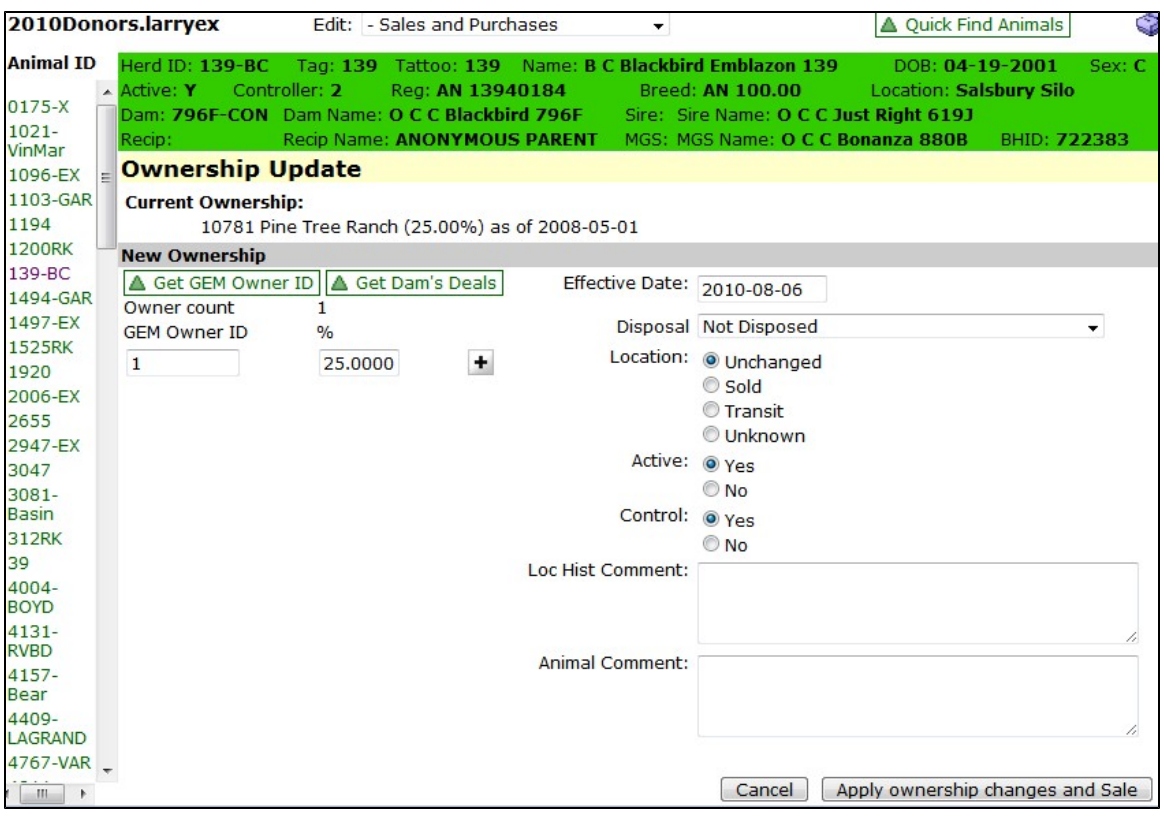
In the above scenario you click the 'Single Seller Sale' button retrieving the ownership screen shown below. In this case 25% of the animal (previous owner's percentage) is transferred to the new Owner GEM ID 1 on clicking the 'Apply Ownership Changes and Sale' button. At the same time the sale amount is entered into the database for the previous owner. Other aspects of the screen are the same as in the 100% sale scenario.
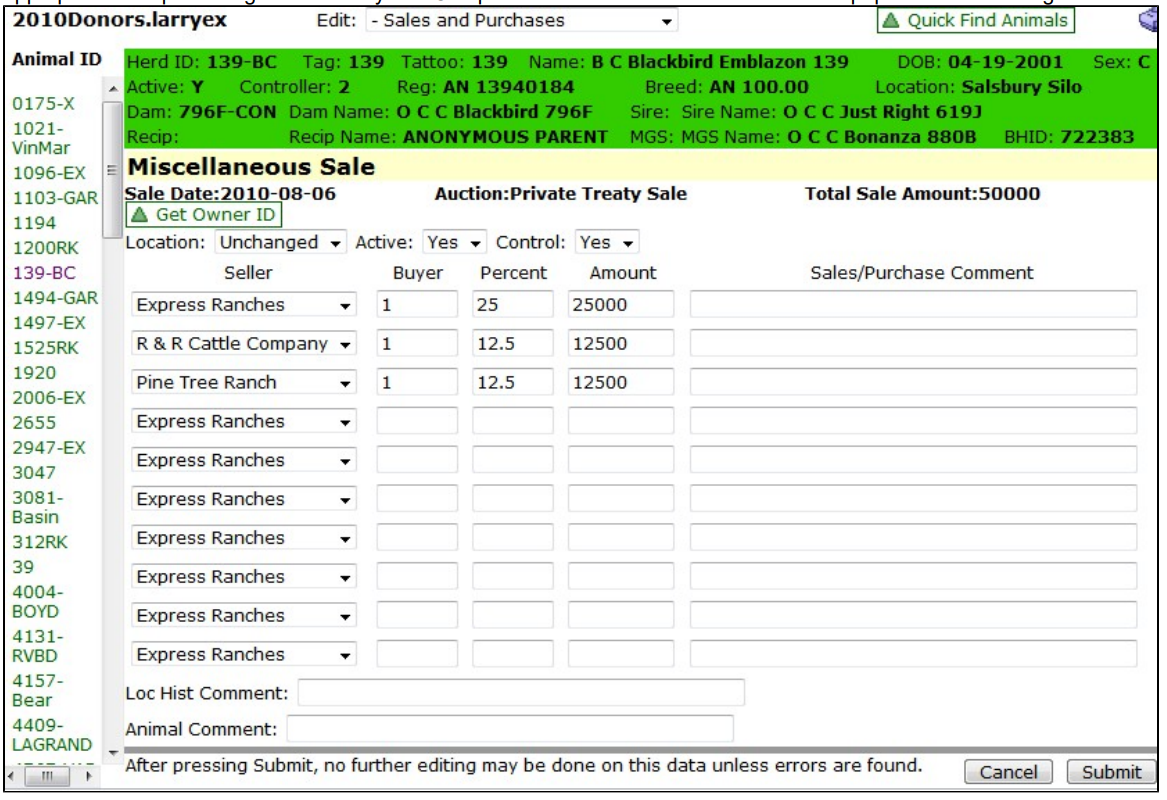
The final sales option is Miscellaneous Sale. In this scenario various ownership portions may be sold and recorded in the database. You start with the same Sales and Purchases screen. Again enter a sale date and total amount the various ownership portions have been sold for in the transaction. It is important to know what portion each seller is selling and the portion that each new buyer is buying. On clicking the 'Miscellaneous Sale' button you get the following screen. In this example each original owner is selling one-half of their ownership portion resulting in GEM ID 1 owning 50 percent of the animal at the end of the transaction. Note you have to enter the Buyer GEM ID and the portion along with the amount he is buying from each of the original owners. The total amount shown in the boxes must equal the Total Sale Amount. On clicking the 'Submit' at the bottom of the screen there will be four owners with GEM ID 1 showing 50% ownership and the original owners showing ownership decreased by the appropriate percentage (one-half of the original percentage in this example). Note that there is only one buyer in this example; however, there could be more than one buyer in a transaction of this type. The rule here is that each current owner is decreased by the appropriate percentage sold and each new buyer shows the appropriate amount paid to each current owner along with appropriate new percentages for the buyers. Complicated sales should be worked out on paper before entering numbers in the boxes.
Medical Treatments Edit
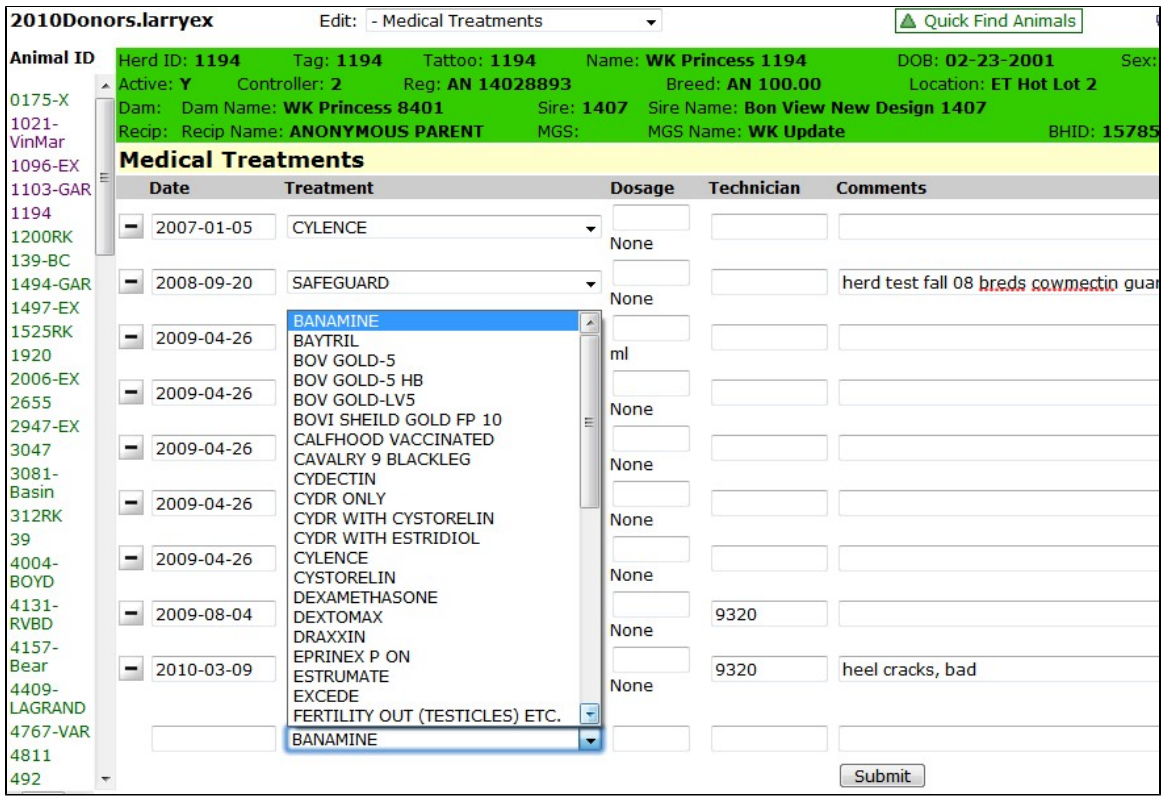
The Medical Treatments Edit / Entry screen shown below allows you to enter information pertaining to an animal's medical or health treatments or procedures. Note this is a single-animal edit/entry screen and since medical treatments are usually applied to a group of animals all at one time it is likely you would use the Batch Jobs / Medical Treatments screen (see Batch Jobs--Medical Treatments). In the screen below the medical history of the animal is shown by date. Each line has a minus sign to the left which if clicked will remove the treatment record. To enter a new record select the treatment from the drop down, enter a date along with Dosage (not required) and Technician GEM ID (not required). A comment may be added. On clicking the 'Submit' the medical record is entered into the database. The medical treatments are created in Administration (see Edit Medical Treatments).
New - Animals
The "New" link under Animals is the starting point for entering new animal records to the database which can be new baby calves or purchased animals whose records may not be on GEM. Note many animals which may be purchased will already have records on GEM. It would be a rare case that an animal(s) purchased from another GEM client did not already have a record on GEM.
Browse - Animals
All Animal Browse screens are meant to look at specific information for one animal on the screen. These are not designed to be printed to paper. Animal Reports are designed to go to paper and print specific data for a group of cattle, usually your currently active animal set.