New - Animals
The "New" link under Animals is the starting point for entering new animal records to the database which can be new baby calves or purchased animals whose records may not be on GEM. Note many animals which may be purchased will already have records on GEM. It would be a rare case that an animal(s) purchased from another GEM client did not already have a record on GEM.
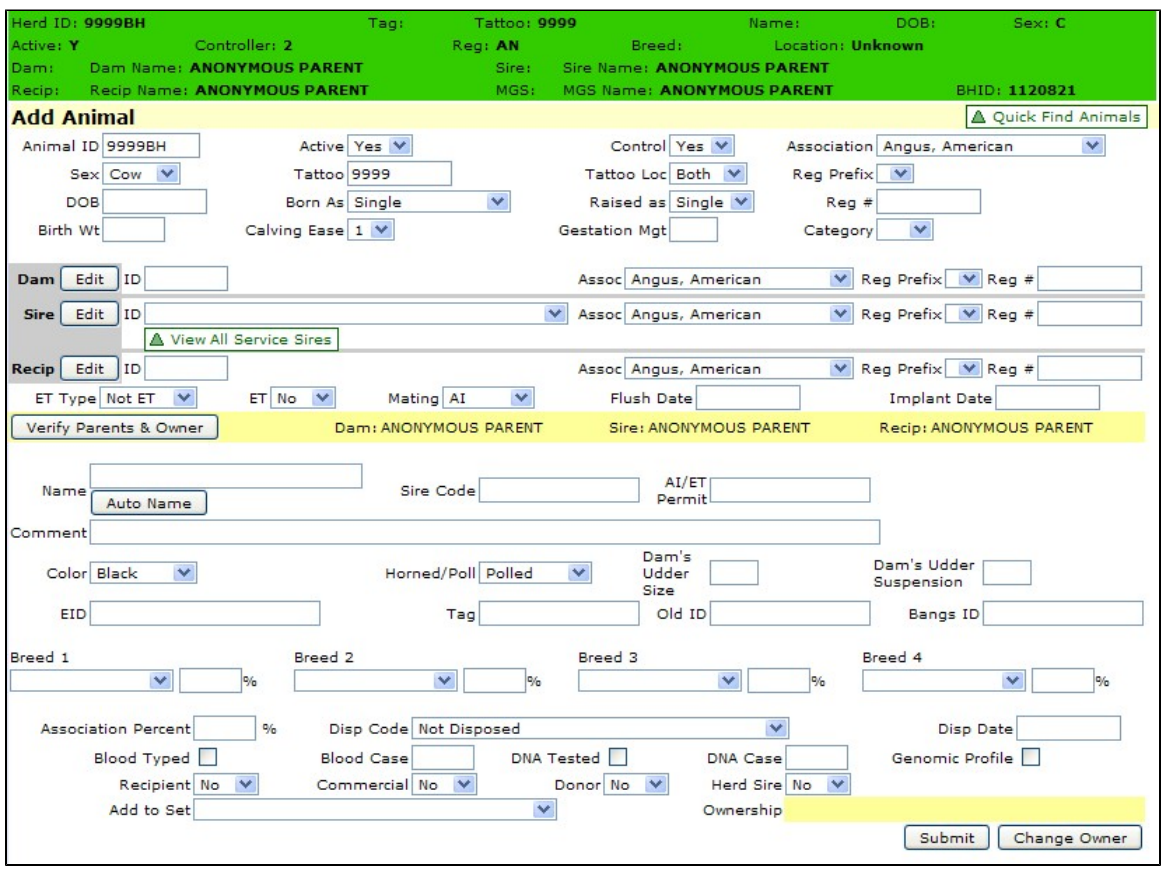
Clicking the "New" link brings up the first screen shown below. Entering new animals is simply a matter of filling in the appropriate boxes. The Association box will default to the breed associated with your log in. When entering new animals it is advisable to create a new empty set and accumulate the IDs in that set. In the screen shot below the set New Baby Calves can be clicked into the 'Add to Set' and on clicking "Next Animal" or "Next Screen" the ID will be added to the set. This allows for easy reference at a later time. Either of the two buttons "Next Animal" and "Next Screen" will create the new animal record when clicked.
The "Next Animal" button is a rapid method of creating the record with only the information entered in the first screen shown below. The record once created is available for use; however, it is missing a significant amount of information. This might be used for rapidly creating records for new calves and then editing them later to provide sire, dam, name and other pertinent information. This limited information record would most often be used for a new purchased animal not found on the database. The basic information in this screen would be entered and then the extended record could be downloaded from the appropriate breed association. Care should be exercised so that an animal is not duplicated on GEM. Before creating a new record on a purchased animal a search via registration number with the "All" radio button highlighted should be conducted. If the animal is not found then a record can be created.

Clicking the "Next Screen" button will take you to the screen shown below. This is a double duty screen in that it serves as an entry screen for new animals and it is also the Edit Base Data screen (see Edit Base Data). In this screen you can enter all of the appropriate information needed for registration. The boxes are fairly self-explanatory and should be reviewed carefully to make sure all information is entered as required by your breed association. Note: nothing is written to the database until one of the two buttons at the lower right-hand of the screen is clicked ("Submit" or "Change Owner"). "Submit" is the usual choice with the ownership defaulting to the current ownership of the dam. If the latter is not the case then you click "Change Owner" and the ownership screen appears allowing you to enter the correct ownership for the new calf (see Edit Ownership). Note that if the newly entered animal is purchased from a non-GEM client you may wish to retain the original ownership until a purchase record can be entered (see Edit Sales and Purchases).
Sires of the current calf crop should show in the drop down seen in the Sire line (Sires must be designated as herd sires, see Edit Private Animal Data). If Dams are active for your log in the Dam ID can simply be entered. Active recipient IDs can be entered. In the case of sires and dams that are not active for the log in operation (most often occurring for donor dams) you can enter the registration number of these parents. Clicking the "Verify Parents" button will let you know if all is correct with the entered parentage. Clicking this button only checks on the validity of the parents it does not write anything to the database.
Some other attributes of importance for this second screen:
The screen will automatically show the designated sire from entered pregnancy check data (see Edit Pregnancy Check) when the Dam ID is entered. There is a link "View All Service Sires" which will pop up a screen showing the entered service sires for the entered Dam ID. A sire can be selected from this service information but it will not override entered pregnancy check data.
The "Auto Name" button allows you to highlight a portion of the dam's name or sire's name and enter it automatically. The format is Herd Prefix, Highlighted portion of the dam or sire's name and new individual's tattoo. You must click "Verify Parents" before the sire and dam names show in the line above the Name box.
If the calf has died it can be disposed in this screen with the appropriate Disp Code and Disp Date.
Find - Animals
The 'Find' link allows you to search for an animal (or group of animals) based on a selection criterion (see first screen below). The criteria available are Animal ID, Registration Number, EID, Tattoo, and BHID. The BHID is an internal database number unique to a particular animal similar to a registration number but specific for the GEM database. There is an Active Status radio button that defaults to "Active" which means the search will be limited to animals active for the log in operation. By highlighting the "All" radio button the search will look thoughout the database according to the criterion specified. Animal Find searches are case-insensitive, meaning it does not matter if you type in a upper or lower case letter, the search ignores the case of your letters. Search criteria includes: Animal ID .
Edit - Animals
Clicking the "Edit" link provides access to a number of edit/entry screens as shown in the insert below. Several of these screens serve both as edit screens for changing existing information and also for entering new information. Your current active set animal IDs listed in sorted order is always shown in the edit/entry screens. A screen is selected by clicking on the screen name in the drop down. You can navigate from one screen to another for any given set by clicking on the screen name in the drop down.